Installing Geopandas#
Early in Practical Data Science, we told you that many data scientists install and manage packages using conda where possible rather than using tools like pip, uv, pyenv, etc. One of the main reasons is that data scientists often need to install lots of complex, non-Python dependencies, and conda does that better than lighter/faster tools like uv. Well, geospatial analysis is a perfect example of where conda shines.
In this class, we’ll be focused on geopandas (for vector data) and rasterio (for raster data). Behind the scenes, though, both of these libraries are mostly wrappers around a set of geospatial libraries that are used everywhere in the GIS world. Whether you’re talking about geopandas, rasterio or stand-alone GIS tools like QGIS, all the computational heavy lifting these programs do is done by a small number of C++ and fortran libraries managed by the OSGeo organization: GDAL (for reading and transforming data, once upon a time called OGR), GEOS for geometric operations (e.g. creating unions or intersections of polygons), and PROJ for managing coordinate reference systems.
As a result, to use geopandas, we have to load LOTS of little C++ dependencies that very often fail to work correctly. In fact, even if you install with conda you can run into issues if you already have lots of other packages installed. So not only will we use conda to install these libraries, but we will also use its “environment management” functionality to put these installations in a clean environment we’ll just use for GIS.
conda Environments#
It’s extremely common in software engineering and data science to need different sets of packages (and potentially different versions of Python) for different projects. To make this easier, conda is capable of creating isolated “environments”, each with their own version of Python and related packages.
Create a New Environment#
To create a new environment, simply run the following code:
conda create -n geo
This will create a new environment and install Python and a couple other standard tools. If you want to specify the version of Python being installed, you can also write something like:
conda create -n geo python=3.12
To use an environment, you first have to “activate” it. When you create the environment, conda will also give you directions about how to activate it. On a mac, this looks like:
#
# To activate this environment, use
#
#     $ conda activate geo
#
# To deactivate an active environment, use
#
#     $ conda deactivate
How to activate an environment, do you as conda instructs! If you’re using Oh-My-Zsh!, then you will also see your current environment reported from the command line:

(And now you know what that (base) that’s always been at the beginning of your commandline meant! It was telling you that you are in your base conda environment).
Once you run that activate command, anything you run from this terminal (including a session of jupyter if you launch it from this command line right now) will be running the Python installation in that environment.
Install Packages#
But because this environment is isolated, none of the packages you had installed in your base environment are accessible anymore, so the first thing you need to do is install whatever packages you need. For what working to be doing with geopandas, I recommend the following:
conda install -c conda-forge geopandas matplotlib jupyter geodatasets
Using Your Environment#
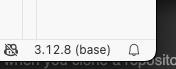
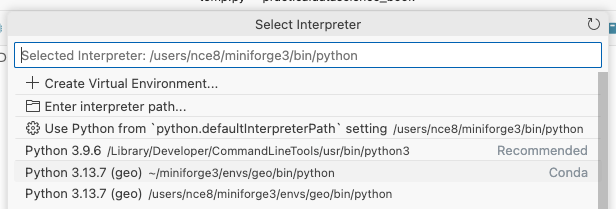
For a tool like VS Code, you have to specify the Python installation you want to use explicitly. For regular Python sessions, just click the Python interpreter icon in the bottom bar:
Then select the version of Python associated with the environment you just created:
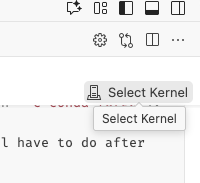
And for Jupyter sessions in VS Code, click on the “Select Kernel” button and you should see an installation (if you installed Jupyter) associated with the environment you want:
Note that if you DONT see your geo environment, quit VS Code and re-open it and try again!